
Alliance Showdown is one of the major events within P&S, with a focus on individual participation and alliance ranking.
This Guide and Reference provides information about the event, all of the quests, as well as strategies for completing quests efficiently, and maximizing your points.
Updated 1/24/2025:
- Added Doomsday section
Updated 11/05/2024:
- Corrected Instacraft counts for “Craft Nano” Quest, and added cost in diamonds.
Updated 9/29/2024:
- Added R4/R5 quick reference (quests to delete)
- Added a few missing quest / point combinations
Updated 9/13/2024:
- Clarification on Joy prize, Ace frags, and Perfect frags for hero quest
- Added missing quest / point combinations
- Added completion timeframes for most quests
Delete These Quests – R4 / R5 Quick Reference
- Delete all question marks
- Delete any quests under 100 points
- If you are “Star” League, delete anything under 150 (Leave a few easy ones for smaller players)
- Delete the following quests:
| Point Values | Mystery Shop | |
|---|---|---|
 |
Mystery 175 (x32) | Delete |
|
Mystery 100 (x12) | Delete |
| Point Values | Help Allies | |
 |
Help 164 (x100) | Delete |
|
Help 127 (x35) | Consider Deleting |
|
Help 109 (x55) | Delete |
| Point Values | Get Gear / Chip / Mod / Cube (GCMC) Material | |
    |
G/C/M/C 113 (x240k) | Delete |
| Point Values | Get Modification Material | |
 |
Mod 120 (x360k) | Consider Deleting |
| Point Values | Gather Resources | |
 |
Gather 143 | Consider Deleting |
|
Gather 113 | Delete |
| Point Values | Consume Stamina | |
| ALL | Excess resource utilization | |
| Point Values | Consume Stamina | |
 |
Stam 104 (x500) | Consider Deleting |
| Point Values | Consume AP | |
 |
ALL | Excess resource utilization |
| Point Values | Get Hero Fragments | |
 |
Hero 113 (x240k) | Consider Deleting |
| Point Values | Get Nanoweapon Material | |
 |
Get Nano 120 (x360k) | Consider Deleting |
| Point Values | Bioenhancer | |
 |
Bio 120 (x360k) | Consider Deleting |
| Point Values | Radio Quiz | |
 |
Radio 167 (x25) | Consider Deleting |
| Point Values | Defeat Zombie Lairs | |
 |
Lairs 97 (x2) | Consider Deleting |
Alliance Showdown – Event Overview
Alliance Showdown occurs every third week, starting on Sunday / Monday at reset, and lasting one week.
- To participate, an alliance must have 20+ members who are HQ 15+
- To accept Showdown quests, a player must be HQ 15+
Alliance League (rank) determines the number of quests each player can accept during the event (quest quota), as well as the reward phases that are available.
| League | Quests | Buy-up | Phases | Theoretical Max per Person |
|---|---|---|---|---|
| Pro | 8 | 1 | 15 | 2160 |
| Veteran | 9 | 2 | 20 | 2640 |
| Elite | 10 | 3 | 25 | 3120 |
| Star | 11 | 3 | 30 | 3360 |
Leagues consist of alliances from different states, usually in groups of about 20, and all alliances start in “Pro” league. To get promoted to the next league level, your alliance must have a total score in the top 5 within your league. If your alliance scores in the bottom 5, they are demoted one league level.
When a player accepts a quest, they have a set amount of time to complete it.
- Each player can only accept one quest at a time.
- If a quest is active, the player sees a blue shield within their sanctuary (on the left, underneath build / research icons).
- If the player fails to fulfill the requirements within the timeframe, the shield turns red, and the quest is “failed”.
- If the player fulfills the quest requirements within the allotted time, the shield turns purple (“completable”), and the player can complete the quest by going back in to the event and clicking the “Complete” button.
- The player must click the “Complete” button before the quest’s timer expires. If the player fulfills the requirements (“completable”), but doesn’t complete the quest before the timer expires, it will be marked as “failed”.
- At any time, the player can cancel a quest, but failed and cancelled quests count toward the quest quota, thus reducing the maximum number of points available to that player.
As the alliance accumulates total points, new reward phases are unlocked.
| Reward Phase | Points | Diamonds | Pro | Veteran | Elite | Star |
|---|---|---|---|---|---|---|
| 1 | 1,000 | Yes | Yes | Yes | Yes | |
| 2 | 2,000 | Yes | Yes | Yes | Yes | |
| 3 | 3,000 | Yes | Yes | Yes | Yes | |
| 4 | 4,000 | Yes | Yes | Yes | Yes | |
| 5 | 5,000 | Yes | Yes | Yes | Yes | |
| 6 | 6,000 | Yes | Yes | Yes | Yes | |
| 7 | 8,000 | Yes | Yes | Yes | Yes | |
| 8 | 10,000 | Yes | Yes | Yes | Yes | |
| 9 | 12,000 | Yes | Yes | Yes | Yes | |
| 10 | 14,000 | 20,000 | Yes | Yes | Yes | Yes |
| 11 | 16,000 | Yes | Yes | Yes | Yes | |
| 12 | 18,000 | Yes | Yes | Yes | Yes | |
| 13 | 20,000 | Yes | Yes | Yes | Yes | |
| 14 | 25,000 | Yes | Yes | Yes | Yes | |
| 15 | 30,000 | Yes | Yes | Yes | Yes | |
| 16 | 35,000 | . | Yes | Yes | Yes | |
| 17 | 40,000 | . | Yes | Yes | Yes | |
| 18 | 45,000 | . | Yes | Yes | Yes | |
| 19 | 50,000 | . | Yes | Yes | Yes | |
| 20 | 55,000 | 20,000 | . | Yes | Yes | Yes |
| 21 | 60,000 | . | . | Yes | Yes | |
| 22 | 70,000 | . | . | Yes | Yes | |
| 23 | 80,000 | . | . | Yes | Yes | |
| 24 | 90,000 | . | . | Yes | Yes | |
| 25 | 100,000 | . | . | Yes | Yes | |
| 26 | 110,000 | . | . | . | Yes | |
| 27 | 120,000 | . | . | . | Yes | |
| 28 | 130,000 | . | . | . | Yes | |
| 29 | 140,000 | . | . | . | Yes | |
| 30 | 150,000 | 50,000 | . | . | . | Yes |
Once the event completes, each participating player can claim one of three prizes from each unlocked reward phase. Prizes include promote choice boxes, resources, marks of glory, gear refiners, Noah tokens, nova points, and speedups.
One of the rewards at phases 10, 20, and 30 are diamonds, and alliance goals for showdown typically center around unlocking these reward phases.
In addition to phase rewards, the 3 top-scoring alliances in each league also get rank rewards.
Quests – Overview
During Showdown, players accept one of many types of quests. Each quest has different fulfillment criteria, and once the criteria has been met (within the allocated time), the quest becomes “completable”.
When you accept a request, it appears in the top-left of the grid.
In the top-center is the “personal” or “star” quest – these are 240-point challenges whose requirements are fairly extreme. Players can delete these by hitting the red minus sign, and they regenerate in 10 minutes. Each player can accept up to 5 “star” quests per day.
| Quest | Description | |
|---|---|---|
 |
Random Quests | As the name implies, you don’t know what the completion requirements are, until after you accept the quest.
Do not accept these. R4’s will delete them regularly. |
 |
Get diamonds via Packs | This only occurs as a “star” quest, and requires $10 purchase. |
|
Consume Diamonds | Spend diamonds on troops, gear, relocates, extra build queue, supply drop, etc. |
|
Mystery Shop | Conduct trades in the Mystery Shop. What complicates these challenges is that you can only make 4 to 5 trades at a time, with a 3 hour refresh period. |
|
Help Allies | When an ally builds a building, researches tech, or heals troops, they can ask for help. |
|
Get Gear Material | Score quest points by obtaining gear promoters and enhancers. |
|
Get Chip Material | Score quest points by obtaining chip promoters and enhancers |
|
Get Module Material | Score quest points by obtaining module promoters and enhancers |
|
Get Cube Material (Gear Factory 25) |
Score quest points by obtaining cube materials and enhancers |
|
Get modification material | Score quest points by obtaining gear modifiers. |
|
Gather Resources | Gather requisite food, wood, steel or gas within the specified time. Higher-point quests require that you gather fairly large amounts of resources. |
| Transport resources to allies | Transport food, wood, steel, or gas to your buddies. These are low-point quests that require large amounts of resources. | |
 |
Total Tech Speedup | Burn speedups to perform tech research. The biggest challenge is to ensure that you have enough resources. |
 |
Total Training Speedup | Burn speedups to train troops.
Of the three main types of speedup quests, this is the best one, because resource consumption and timeframes are predictable. |
 |
Total Build Speedup | Burn speedups to build or upgrade buildings. |
 |
Speedup (Build/Tech/Training) | This is one of the best speedup quests.
Burn speedups on research, training troops, or upgrading buildings. |
|
Consume Stamina | Burn stamina by hunting zombies or joining rallies. |
|
Consume AP | Burn AP. Normally, AP is used for campaign (puzzle) levels, but during holiday events, AP can be burned on special characters on the map. |
|
Get Hero Frag | Score quest points by obtaining hero fragments. |
 |
Craft nanoweapons (Gear Factory 20) |
Craft nanoweapons and use nano insta-crafts to speed up crafting. |
|
Get Nanoweapon Material (HQ 20) |
Score quest points by burning minty-blue nano boxes to get gear material. |
|
Bioenhancer | Score quest points by obtaining bioenhancers and fragments. |
 |
Arena Challenge | Participate in arena challenges (win, lose, or flee) |
|
Quiz | Take radio quizzes (correct or incorrect) |
 |
Purchase Pack | This appears ONLY as a star quest – must purchase 15 packs at a minimum of $1 each or $15. |
|
Defeat Zombie Lairs | Join or lead any rally to defeat zombie lairs. |
Sometimes the same quest will have different point values, where demand is higher at higher point values. For example, the “Help Allies” quest for 150 points requires 35 helps, but the higher 210 point one requires 75 helps.
R4 / R5 can delete any quest at any time except ones that have already been accepted, and “star” quests. Normally, R4/R5 will prune the quests multiple times per day, removing low-scoring quests (anything less than 100 points), “?” quests, and difficult quests with poor point values.
Because these are obvious, and there is no strategy involved, we won’t be discussing the following quests:
- – Random “?”
- – Obtain diamonds via packs
- – Purchase pack
Quest – Consume Diamonds
Completion
Spend the requisite number of diamonds within the allotted time.
Quests
| Points | Diamonds | Timeframe |
|---|---|---|
| 240 | 100,000 | 4D |
| 169 | 50,000 | 4H |
| 132 | 25,000 | 3H |
| 114 | 12,000 | 2H |
| 101 | 3,000 | TBD |
Analysis
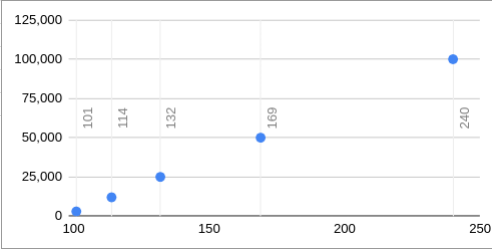
As you can see:
- All point values are above 100 points (101 just barely)
- The point gradient is linear
Strategy
- Timeframes are usually short – e.g. 6 hours or less
- Have the diamonds on-hand before you accept the quest
- Check your big builds first – burning diamonds is good for upgrading dependencies
- If you don’t have anything else to spend it on, use diamonds to train troops
Quest – Mystery Shop
Completion
Execute the specified number of trades within the allotted time.
Quests
| Points | Trades | Timeframe | Notes |
|---|---|---|---|
| 210 | 15 | 3D | . |
| 180 | 12 | 2D | . |
| 175 | 32 | 4D | Delete this quest. |
| 150 | 10 | 1D | . |
| 122 | 8 | 1D | . |
| 100 | 12 | 3D | Delete this quest. |
| 84 | 8 | 2D | Delete quests under 100 points |
Analysis
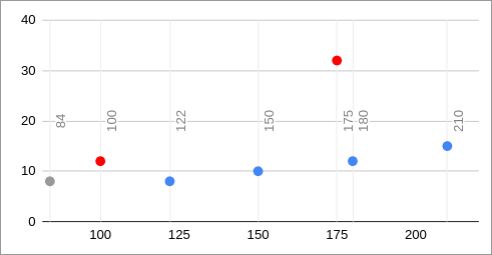
These quests should be deleted:
- 175 point quest requires a minimum of 18 hours to complete, vs. the 180 point quest which only requires 6.
- 100 point quest requires 12 trades (6 hours), which is the same as the 180 point quest.
- 84 – quests under 100 points should be deleted.
Strategy
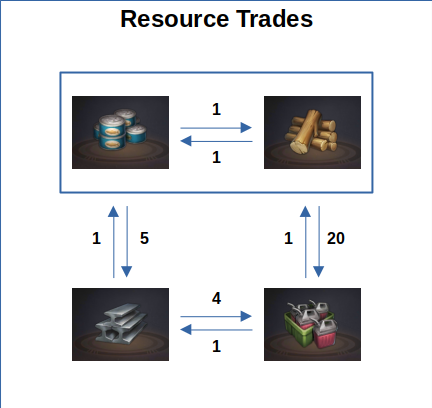
Mystery quests offer the best points for the least resource usage.
- As you make trades in the mystery shop, you may be offered a trade for diamonds. This is often to exchange diamonds for marks of glory, direct relocates, Nova points, or similar. If you have a quest x10 or x15, ALWAYS take the diamond trade, as this potentially saves you 3 hours.
- Mystery trades come in two flavors….
- Resource trades – these ALWAYS give you more resources. Food/Wood -> Steel is 5:1, and Steel -> Gas is 4:1. Try to trade food/wood for gas or steel, not the other way around
- Speedup trades – general and tech (research). Try to avoid research speedup trades, as these benefit you the least.
- Always pay attention to the trades — trade for resources first, then speedups second. If you are short on resources, this can help quite a bit.
- Set a timer so that you don’t forget about your quest! I have failed MANY quests because I accept a mystery quest and forget about it until after it expires.
- On Sunday, R4 should delete any Mystery quest that takes you past reset. For example, delete x32. Also, after reset -6 hours, none of the Mystery quests can be completed before showdown ends (Sunday, reset).
Quest – Help Allies
Completion
Hit the help button the specified number of times.
Quests
| Points | Helps | Timeframe | Notes |
|---|---|---|---|
| 210 | 75 | 3D | . |
| 180 | 50 | 2D | . |
| 164 | 100 | 4D | Delete this quest. |
| 150 | 35 | 1D | . |
| 127 | 35 | 1D | Consider deleting this quest. |
| 109 | 55 | 3D | Delete this quest. |
| 85 | 35 | 2D | Delete any quest below 100 points. |
Analysis
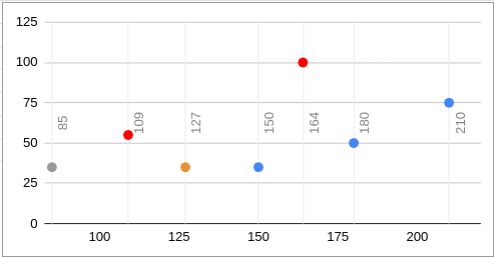
These two quests should be deleted:
- 109 points for 55 helps. The 180 point challenge only requires 50 helps.
- 164 points for 100 helps. First, the points are completely insufficient. The 210 help quest only requires 75 helps. Second, giving someone 100 helps, especially by yourself, is brutal.
On the Maybe list:
- 127 points for 35 helps. This is a good quest to keep when waiting for other quests to refresh, or for someone to get their last few points on Sunday.
Delete anything under 100 points:
- 85 points for 35 helps.
Strategy
- Be aware of the timeframes for these quests. Make sure that if you grab one, someone will be around to help you 🙂
- As an alliance, have a couple of pre-set times where people can get helps. I usually do mid-day, and then again 30 minutes before events.
Note: This approach also works well when you are saving up for tickets. Each player can get 50k alliance coin per day via helps. - To give helps, heal in small batches. Heal 1 or 2 troops at a time so that the total healing time is 5 to 10 seconds. If you enter a number next to the troops you want to heal, for example, 2, then 2 stays there. You can then repeatedly hit “Heal” then “Help” then “Heal” then “Help”, etc…
- Try to make sure you have all of the resources before you start to heal. Having to stop every couple of heals to grab more resources slows things down.
- Watch for lag. You might lag, or the other player might lag, or both.
- Use clear call-outs in alliance chat. The person healing can’t see alliance chat, so it’s important that you stop grabbing helps as soon as you are done. This signals the other person to stop healing troops.
- If Dead Rising occurs before showdown, I leave my troops wounded so that I can provide heals. This is much better than having to burn stam to go hit a zombie or zombie lair.
Example of callouts in Alliance chat:
| Player 1 | Player 2 |
|---|---|
| “I need 50 helps please” | . |
| . | “Ready?” |
| “Yes” | . |
| [Starts hitting help button] | [Starts healing in batches] |
| [Stops pressing help when done] | [Batch heals without help] |
| “All done! TY!” | |
| . | “YW” |
Clear and concise call-outs ensure that the process runs smoothly, and that other alliance members know what’s going on.
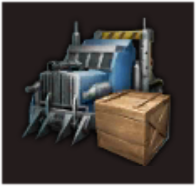
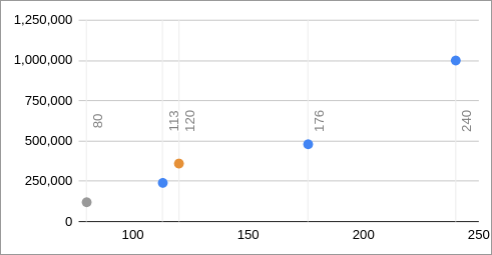
Quest – Get Gear / Chip / Module / Cube Material
These are 4 separate types of quests, but I’m grouping them together because the requirements, point values, and timeframes are all the same.
Completion
There is a point system within the quest, and different requests require varying amounts of quest points:
| Quest Points | Gear Material | Chip Material | Module Material | Cube Material |
|---|---|---|---|---|
| 100 | 1* Gear Enhance Material | 1* Chip Enhance Material | 1* Module Enhance Material | 1* Cube Enhance Material |
| 500 | 2* Gear Enhance Material | 2* Chip Enhance Material | 2* Module Enhance Material | 2* Cube Enhance Material |
| 2,000 | 3* Gear Enhance Material | 3* Chip Enhance Material | 3* Module Enhance Material | 3* Cube Enhance Material |
| 5,000 | 4* Gear Enhance Material | 4* Chip Enhance Material | 4* Module Enhance Material | 4* Cube Enhance Material |
| 20,000 | 5* Gear Enhance Material | 5* Chip Enhance Material | 5* Module Enhance Material | 5* Cube Enhance Material |
| 1,000 | Gear Promoter | Chip Promoter | Module Promoter | Cube Promoter |
| 5,000 | Gear Promoter II | Chip Promoter II | Module Promoter II | Cube Promoter II |
| 40,000 | Gear Promoter III | Chip Promoter III | Module Promoter III | Cube Promoter III |
| 10,000,000 | – | Chip Amplifier Design | Module Amplifier Design | – |
| 0 | – | – | – | Promote Cube |
Once the requisite quest points have been achieved, the quest is completable. The quest point status / progress can be checked at any time by viewing the quest.
Quests
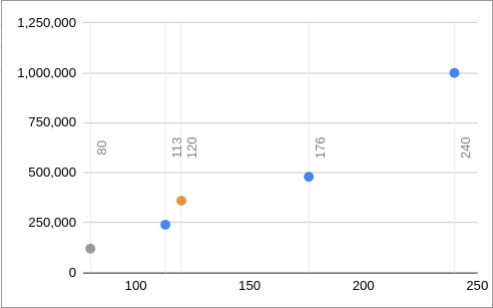
| Showdown Points | Quest Points | Timeframe | Quest Points |
|---|---|---|---|
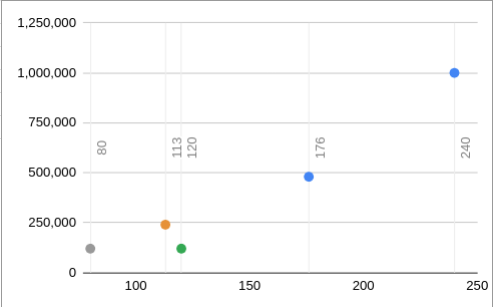
| 176 | 800,000 | 1D6H | . |
| 120 | 200,000 | 12H | Easy points! |
| 113 | 400,000 | 1D | Delete this quest |
| 80 | 200,000 | 18H | Delete any quest below 100 points |
Analysis
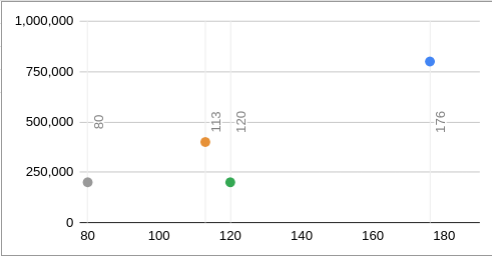
The 113 point quest requires twice as much material as the 120 point task for about the same amount of points, and should be deleted.
Obviously, the 80 point quest should be deleted because it’s under 100 points, but also because the point requirement is the same as the 120 (higher points for same requirement).
Strategy
The easiest way to beat the G/C/M/C challenges is with boxes:
| Box | In Box | Quest Points | |
|---|---|---|---|
 |
Promote Choice III | 1 | 40,000 |
 |
Promote Choice II | 2 | 10,000 |
 |
Promote Choice | 10 | 10,000 |
 |
Enhance Choice (1*) | 100 | 10,000 |
Note that all of them except Promote Choice III are 10,000 quest points. This makes the math fairly easy – if I have a 200k point challenge, that’s 20 boxes. 800k is 80 boxes, etc.
Any of the boxes can be used for any of the four types of material: Gear, Chips, Modules, Cubes. Therefore, as long as you have enough boxes, you can grab any of the four types.
I try to save up 200 to 300 boxes for each showdown, and I use the Promote III boxes sparingly.
Other tips:
- 😎 Save up Ruins medals before Showdown. You can get 750,000 chip material points per day from the ruins:
| Ruins Shop Item | Qty per Day | Medals | Quest Points |
|---|---|---|---|
| Chip Promoter II | 40 | 2,000 | 200,000 |
| Chip Promoter | 200 | 2,000 | 200,000 |
| 3* Chip Enhance | 100 | 1,500 | 200,000 |
| 2* Chip Enhance | 200 | 800 | 100,000 |
| 1* Chip Enhance | 500 | 500 | 50,000 |
| Total per Day: | – | 6,800 | 750,000 |
- 😎 Similarly, save up Rare Earth to get Module material:
| Rare Earth Shop | Qty per Day | Rare Earth | Quest Points |
|---|---|---|---|
| Module Promoter II | 30 | 1,800,000 | 150,000 |
| Module Promoter | 100 | 800,000 | 100,000 |
| 4* Module Enhance | 10 | 320,000 | 50,000 |
| 3* Module Enhance | 20 | 276,000 | 40,000 |
| 2* Module Enhance | 50 | 200,000 | 25,000 |
| Total per Day: | – | 3,396,000 | 365,000 |
- 😎 If you are lucky enough to have a Feast coming up, grab a Gear Material quest. You can easily complete smaller quests, or get half or more of a 176-point quest.
- You can buy G/C/M/C material from Super Value Diamond shop
- Most of the holiday shops have G/C/M/C material
- Lairs drop boxes, and the boxes may contain gear enhancers
- You can get Cube material from the Flag Capture Shop and the Water (AKA Alliance Clash / Reservoir War) Shop
- You must be HQ25+ with Gear Factory 25+ in order to accept the Cube Material quest
Quest – Get Modification Material
Completion
Similar to G/C/M/C quests, there is a point system.
| Points | Material |
|---|---|
| 3,000 | Get Gear Modifier |
| 30,000 | Get Gear Lock |
| 3,000 | Get Chip Modifier |
| 3,000 | Get Module Modifier |
| 3,000 | Get Cube Modifier |
| 3,000 | Get Nanoweapon Modifier |
| 3,000 | Get Organ Modifier |
Once the requisite quest points are earned, the quest can be completed.
Quests
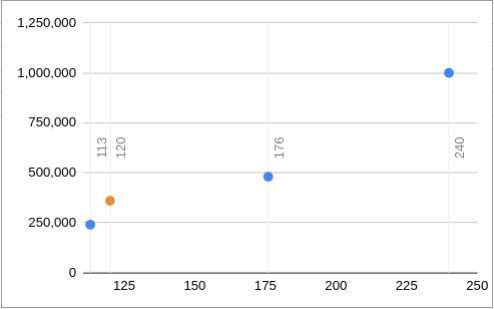
| Points | Material Points | Timeframe | Notes |
|---|---|---|---|
| 240 | 1,000,000 | TBD | . |
| 176 | 480,000 | 1D6H | . |
| 120 | 360,000 | 12H | Consider deleting this quest. |
| 113 | 240,000 | TBD | . |
| 80 | 120,000 | TBD | Quests under 100 points should be deleted. |
Analysis
- Consider deleting the 120 point quest requires excessive material.
- Delete the 80 point quest because it’s under 100 points.
Strategy
Note: Normally, I just delete this quest. I very rarely see anyone grab it.
Use Modification boxes. This section will be expanded once I know the scoring system 🙂
Quest – Gather Resources
Completion
Gather the requisite amount of the specified resource within the allotted time.
There are four different quest types at each point value:
- Food
- Wood
- Steel
- Gas
For example, the 172 “Gather Gas” quest requires 360,000 gas.
Quests
| Points | Food / Wood | Steel | Gas | Timeframe | Notes |
|---|---|---|---|---|---|
| 172 | 7,200,000 | 1,440,000 | 360,000 | 1D9H | . |
| 143 | 7,200,000 | 1,440,000 | 360,000 | 3D | Consider deleting these quests. |
| 138 | 4,800,000 | 960,000 | 240,000 | 22H | . |
| 113 | 4,800,000 | 960,000 | 240,000 | 3D | Delete these quests. |
| 106 | 2,400,000 | 480,000 | 120,000 | 11H | . |
| 89 | 1,200,000 | 240,000 | 60,000 | 6H | Quests under 100 points should be deleted. |
| 82 | 2,400,000 | 480,000 | 120,000 | 1D | Quests under 100 points should be deleted. |
| 67 | 1,200,000 | 240,000 | 60,000 | 2D | Quests under 100 points should be deleted. |
Analysis
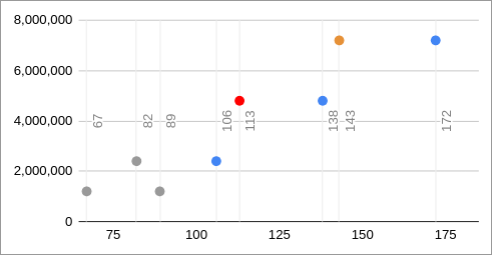
- Delete the 113-point quest, which requires the same resources as the 138 quest, but the points are terrible.
- Delete the 67, 82, and 89 point quests, as they are under 100 points.
- Consider deleting the 143-point quest. On the one hand, it requires the same resources as the 172 quest, but on the other hand, the points are decent.
Strategy
Completing this quest, especially at higher point levels, depends largely on your ability to gather. This means having all 5 marches, using gather speedups, using the “Alliance Resource” skill if possible, and “Swift Gatherer” commander skill if possible.
Relative resource values are followed fairly consistently throughout the game:
- Food and Wood are 1:1 (same cost)
- Food / Wood is 5:1 for Steel
- Food / Wood is 20:1 for Gas
- Steel is 4:1 for Gas
These costs also apply to:
- Carrying capacity – for example, the same number of troops are required to carry 20,000 wood or 1,000 gas
- Gathering time – for example, it takes about 20 minutes to gather 20,000 wood or 1,000 gas
- Resource tiles – For a given tile level, the resource quantities are in proportion. For example, a level 6 wood tile contains 280,000 wood, while a level 6 gas tile contains 14,000 gas (20:1).
Fortunately, all of the gathering quests are also in proportion. For example, the 172 wood challenge requires 7,200,000 wood, whereas the 172 gas challenge requires 360,000 gas, which is proportionate at 20:1.
This means that all of the gathering quests for a specified point value (wood / food / steel / gas) require the same amount of time, troops, and resource tiles to complete.
| Number of Gathers (5 queues): | ||||||||
|---|---|---|---|---|---|---|---|---|
| Level | Food/Wood | Steel | Gas | 172 / 143 Points | 138 / 113 Points | 106 / 82 Points | 89 / 67 Points | Gathering Time |
| 1 | 20,000 | 4,000 | 1,000 | 72 | 48 | 24 | 12 | 12 min |
| 2 | 40,000 | 8,000 | 2,000 | 36 | 24 | 12 | 6 | 24 min |
| 3 | 80,000 | 16,000 | 4,000 | 18 | 12 | 6 | 3 | 48 min |
| 4 | 135,000 | 27,000 | 6,750 | 11 | 8 | 4 | 2 | 1 hrs, 21. min |
| 5 | 200,000 | 40,000 | 10,000 | 8 | 5 | 3 | 2 | 2 hrs |
| 6 | 280,000 | 56,000 | 14,000 | 6 | 4 | 2 | 1 | 2 hrs, 48. min |
| 7 | 400,000 | 80,000 | 20,000 | 4 | 3 | 2 | 1 | 4 hrs |
| Total Gathering Time (regardless of tile level): | 16 hrs | 12 hrs | 8 hrs | 4 hrs | ||||
| Swift Gather: | 12 hrs | 8 hrs | 4 hrs | 0 hrs | ||||
Note: Everyone’s gathering boosts are different. You may have gathering times that are longer or shorter. The estimates above are based on a 4-hour gather time for L7 tiles.
If you have only 4 marches:
| Number of Gathers (4 queues): | ||||
|---|---|---|---|---|
| Lvl | 172 / 143 Points | 138 / 113 Points | 106 / 82 Points | 89 / 67 Points |
| 1 | 90 | 60 | 30 | 15 |
| 2 | 45 | 30 | 15 | 8 |
| 3 | 23 | 15 | 8 | 4 |
| 4 | 14 | 9 | 5 | 3 |
| 5 | 9 | 6 | 3 | 2 |
| 6 | 7 | 5 | 3 | 2 |
| 7 | 5 | 3 | 2 | 1 |
| 20 hrs | 12 hrs | 8 hrs | 4 hrs | |
- Use 50% Gather Speedup, which can be purchased for diamonds or Alliance Coin. As the name does not imply, this reduces your gathering time by about 33%.
| Math Stuff:
Your gather time (time it takes to gather) is the inverse (1/x) of your gather speed (how quickly you gather). If your original gather speed was 1, your gather time was 1/1 = 1. Starting with a gather speed of 1, the boost is 50% of 1, or 0.5. Since this is a boost, we add the boost amount to the original amount, or 1 + 0.5 = 1.5. The boosted gather speed is 1.5, and the tine is the inverse of the speed, 1/1.5 or about 0.66. The net savings in gathering time is the original time, 1, minus the new time 0.66, which is about 0.33 (33% time savings) If your original gather time is 4 hours, your boosted time will be about 2 hours and 40 minutes. |
- During Showdown, most alliances alternate between gas and steel, allowing you to gather from alliance in order to finish gathering quests. Conversely, food and wood tiles are more plentiful, and therefore easier to get during showdown. Check with your alliance members to see which quests they prefer, and delete the rest.
- Alliance officers can also activate “Alliance Resource” skill, which gives everyone within the alliance territory up to +50% gather speedup, which stacks with the regular 50% gather speedup. If your alliance has maxed out the skill, you get an additional 50% speedup (100% total), and this brings your gather time down to about 50% of normal.
- Finally, if you have commander level 50 and VIP 10+ you can define a talent set that includes “Swift Gatherer” (under economy). When you activate this skill, it causes your troops to instantly gather up to their carrying capacity, or until the tile is empty, and then return home. With Swift Gatherer, minus march time, you can instantly eliminate an entire gather.
For example, if you do 172 point quest (wood / food / steel / gas doesn’t matter), you would normally need 4 gathers consisting of 5 marches, all gathering level 7 tiles (20 x L7 tiles). Each gather takes about 4 hours (your time will vary based on your individual boosts) without gather speedup, which means that it takes about 16 hours to complete. However, minus march time, you can use Swift Gatherer to eliminate one of those 4-hour gathers, and complete the quest in 12.
With 50% gather speedup, the time is about 2/3 of 12, or 8 hours, which isn’t bad for 172 points!
Unfortunately, if you only have 4 marches, you probably don’t have access to Swift Gatherer, so it’s going to take you 20 hours to clean the same 20 tiles. With a 50% gather speedup, that’s 2/3 of 20 or about 13.3 hours. Still do-able.
Doomsday Expedition – Considerations
- Resource tiles go up to level 13
| Level | Food/Wood | Steel | Gas |
|---|---|---|---|
| 8 | 520,000 | 104,000 | 26,000 |
| 9 | 640,000 | 128,000 | 32,000 |
| 10 | 760,000 | 152,000 | 38,000 |
| 11 | 880,000 | 176,000 | 44,000 |
| 12 | *1,000,000 | *200,000 | *50,000 |
| 13 | *1,120,000 | *224,000 | *56,000 |
*Estimated
- Swift Gatherer commander skill does work in Doomsday. So if you are lucky enough to grab five level 13 resource tiles, you can instantly gather 5.6M food/wood, 1.1M steel, or 280K gas.
- You have to be in Alliance territory (not in Doom) for Alliance Skills to apply. If you are in Doom and someone applies it, you miss out. If your alliance plans to use “Alliance Resource” skill, send out notification so that people can plan to pull out of Doom in order to avoid missing out.
- Likewise, if the Governor uses the Gathering Boost State Decree, you will miss out if you aren’t in the state, including inside of Doom. So again, careful coordination is recommended.
- State Title boosts do not apply in Doom.
- You do NOT need a War Hound to gather resources.
- March times can be significantly longer, so consider teleporting.
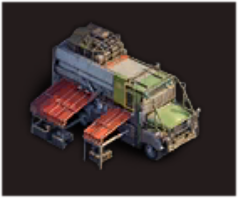
Quest – Transport Resources to Allies
![]()
Completion
Transport specified quantity of resources to one or more allies (alliance members) within the allotted time.
Quests
| Points | Resources | Timeframe | Notes |
|---|---|---|---|
| 110 | 36,000,000 | 12H | . |
| 87 | 24,000,000 | TBD | Delete quests under 100 points. |
| 63 | 12,000,000 | 6H | Delete quests under 100 points. |
| 56 | 3,000,000 | TBD | Delete quests under 100 points. |
| 52 | 6,000,000 | 3H | Delete quests under 100 points. |
Analysis
![]()
This type of quest is fairly straightforward… delete everything except the 110 point quest.
Note: Due to the effort and resources involved, some alliances just delete this quest altogether. (Thank you, Woody for the feedback)
Strategy
Not much strategy is required. If you have excess resources and need 110 points, go for it.
One thing you can do to line up the quests nicely is to do Gather quests during Valliant Conquest. Once you have the resources and complete the Gather quest, do a Transport quest. This gives you Valliant points, plus two Showdown quests, all using the same resources.
Doomsday Exploration – Considerations
- Transporting resources does NOT require a War Hound.
- Consider relocating close to your target before beginning transport.
- Just as on the normal map, if you begin transporting resources, but the target teleports before receiving them, the resources are instantly delivered.
Quest – Speedups – Build / Tech / Train
Completion
Use speedups to accelerate the requisite amount of time, within the allotted timeframe.
- Build – Accelerate building upgrades
- Tech – Accelerate research
- Train – Accelerate training troops
- Build / Tech / Train – Accelerate any combination of the three
Quests
|
|
|
|
|||||
| Points | Speedups | Hours | Build | Tech | Train | Build/Tech/Train | Completion Timeframe |
Notes |
|---|---|---|---|---|---|---|---|---|
| 240 | 20D | 480 | Yes | Yes | Yes | Yes | 4D | . |
| 210 | 18D | 432 | Yes | Yes | . | . | 3D | . |
| 180 | 15D | 360 | . | Yes | . | . | 2D | . |
| 176 | 13D8H | 320 | Yes | Yes | Yes | . | 1D6H | . |
| 157 | 13D8H | 320 | . | . | . | Yes | 2D | . |
| 150 | 12D | 288 | . | Yes | . | . | 1D | . |
| 121 | 8D8H | 200 | . | . | . | Yes | 1D12H | . |
| 120 | 8D8H | 200 | Yes | Yes | Yes | . | 1D | . |
| 113 | 2D2H | 50 | Yes | Yes | Yes | . | 18H | Easy Points! |
| 80 | 20H | 20 | Yes | Yes | Yes | . | 12H | Delete |
| 78 | 2D12H | 60 | . | . | . | Yes | 1D | Delete |
| 66 | 20H | 20 | . | . | . | Yes | 12H | Delete |
Analysis
(I think I captured all of the speedup quests accurately – if I missed something please leave a comment)
The point of each quest is to use a specified number of hours of speedups.
Not all quest types have all of the same point values. For example, all four types have a 240 point quest (20D), but only Build/Tech/Train has a 157.
The only quests that need to be deleted are the 80 point Build, Tech and Train quests, Build/Tech/Train 66 and 78 points. The 80 point quests could be good “point filler” quests for Sunday, right before showdown ends.
Build/Tech/Train quests tend to have a slightly lower point value, presumably because you have more flexibility to use multiple types of speedups in order to complete the quest. Even at slightly lower point values, they all good quests.
The 113 point quests are a “bargain”, requiring only 2 days and 2 hours (50 hours) of speedups.
Strategy
| Overall Strategy |
|
|---|---|
| Strategy – Build |
|
| Strategy – Tech |
|
| Strategy – Train |
|
| Strategy – Build/Tech/Train |
|
Doomsday Expedition – Considerations
- Consider relocating nearby before transporting.
- Transporting does NOT require a War Hound
- Just as on the normal map, if you begin transporting and the target relocates while resources are in transit, this causes the resources to arrive instantly.
Quest – Consume Stamina
Completion
Join zombie lairs or hunt zombies on the map in order to burn the requisite amount of stamina in the required timeframe.
Quests
 |
|||||
| Points | Stamina | Cans | Timeframe | Notes | |
|---|---|---|---|---|---|
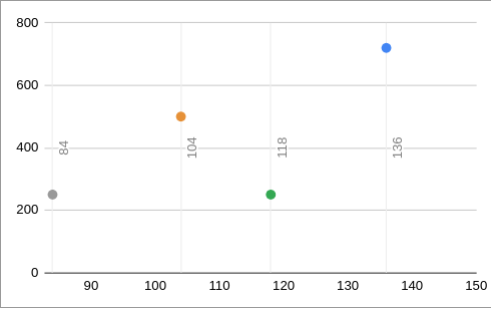
| 136 | 720 | 120 x5 | 4D | . | |
| 118 | 250 | 120 x2 | and 10 x1 | 1D | Easy Points! |
| 104 | 500 | 120 x4 | and 10 x2 | 3D | Consider deleting |
| 84 | 250 | 120 x2 | and 10 x1 | 2D | Delete quests under 100 points |
Analysis
The 120-point quest is easy points, requiring only 200K material points.
However, the 113-point quest requires double the material for fewer points. Consider deleting this quest.
Strategy
Ways to get stam:
- The main source of stam for these quests is stam cans.
- You start with 120 stam (full) at the start of the day, after your stam has replenished overnight.
- It takes about 14 hours for your stam to replenish, or less depending on your boosts.
- You can stack stam by attacking a 55 lair with 1 taxi on a 1-hour rally. While the hour passes, you replenish stam, but you also get your stam back when you fail the lair (or if it doesn’t run because no one joined)
- You can get up to 30 stam by doing daily quests.
The 118-point quest (250 stam) is a great way to earn easy points, especially in a less-active alliance. Also, 250 stam is easily attainable in 1 day, even without using any cans.
I find it faster to hunt zombies rather than run lairs, unless you are in a very active alliance with lots of lairs. Lairs burn a lot of stam, but you have to wait at least 5 minutes for each lair. In contrast, by only hunting level 30-40 zombies, I’ve been able to complete this challenge in under 20 minutes.
Doomsday Expedition – Considerations
- Zombie lairs in Doomsday start at level 30 and go up to level 70
- Attacking War Hound Factories (towers) is equivalent to hunting zombies on the normal map, and require roughly equivalent stam.
- You need a war hound for each march. If you are using multiple marches to join lairs or hunt zombies, you need multiple war hounds.
Quest – Consume AP
Completion
Consume the requisite amount of AP within the specified timeframe.
AP is used for campaign (puzzle) levels, or for certain holiday events. For example, the travelling merchant, puppies and kittens, and other holiday events appear as entities on the world map, and interacting with them requires AP.
Quests
 |
||||
| Points | AP | AP Refill (120) | Timeframe | Notes |
|---|---|---|---|---|
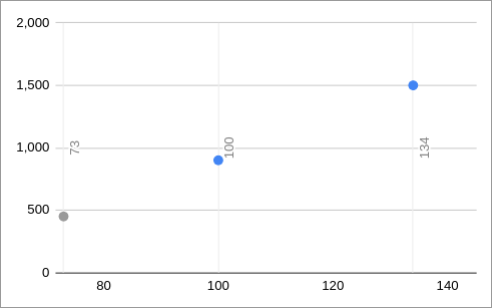
| 134 | 1,500 | 13 | 4D | . |
| 100 | 900 | 8 | 3D | . |
| 73 | 450 | 4 | 2D | Delete quests under 100 points |
Analysis
Delete the 73-point quest because it’s under 100 points.
Note: Due to the resources required, some alliances delete this quest altogether. (Thank you, Woody, for the feedback!)
Strategy
All of these quests burn a lot of AP and the points aren’t that great.
The amount of AP refills you can use in one day depends on your VIP level.
| VIP Level | AP Item Limit |
|---|---|
| 1 | 2 items (240 AP) |
| 2 | 3 items (360 AP) |
| 3 | 4 items (480 AP) |
| 4 | 5 items (600 AP) |
| 5 | 6 items (720 AP) |
| 6 | 7 items (840 AP) |
| 7 | 8 items (960 AP) |
| 8 | 9 items (1080 AP) |
| 9 | 10 items (1200 AP) |
| 10 | 11 items (1320 AP) |
| 11 | 12 items (1440 AP) |
| 12 | 14 items (1680 AP) |
| 13+ | Unlimited |
Note: Using 1200 AP in one day unlocks the “Marathon” achievement underneath “Pathfinder” category.
Personally, I don’t ever do the AP quests because the points aren’t worth the effort. The exception is 134-point (1,500 AP) quest, if you are VIP 11+, and if there is a holiday event (Merchants or kittens and puppies) where you can burn a lot of AP quickly.
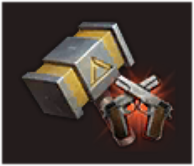
Quest – Get Hero Fragments
Completion
Similar to the “Get Material” quests, this one has an internal point system:
| Points | Hero Frag |
|---|---|
| 0 | Get Hero via Epic Hero Choice Card or Tavern Exchange |
| 500 | 2★ Hero Frag |
| 2,000 | 3★ Hero (Perfect) Frag |
| 8,000 | 4★ Hero (Perfect) Frag |
| 20,000 | 5★ Hero (Perfect) Frag |
| 30,000 | 6★ Hero (Perfect) Frag |
To complete the quest, get hero fragments in order to score points. Score the requisite number of points within the allotted time in order to complete the quest.
Quests
| Points | Points | Timeframe | Notes |
|---|---|---|---|
| 240 | 1,000,000 | 4D | . |
| 176 | 480,000 | 1D6H | . |
| 120 | 120,000 | 12H | Easy Points! |
| 113 | 240,000 | 1D | Consider deleting this quest. |
| 80 | 120,000 | TBD | Delete quests under 100 points |
Analysis
The 120-point quest for 120k is easy points!
Consider deleting the 113-point quest for 240k, which requires double the material of the 113-point quest. Because this is an easy quest, sometimes I leave this one, especially if all the other quests are refreshing.
Delete the 80-point quest because it’s under 100. However, this is a good “point filler” quest to leave out there on Sunday.
Strategy
This is one of my favorite quests because there are many, many ways to get fragments.
Just to recap:
- To unlock a hero, you need 10 fragments of that hero.
- Obtaining a hero, for example from Noah’s Tavern, means obtaining 10 fragments of that hero.
- Some methods give you individual fragments, while other methods give you a chance to win a single fragment or the hero (10 fragments).
One of the main methods of obtaining hero frags is to use specific items.
| Item | Quest Points | Notes | |
|---|---|---|---|
 |
5★ Hero Choice Card | 20,000 | Gives: 1 x 5★ Frag |
 |
4★ Hero Choice Card | 8,000 | Gives: 1 x 4★ Frag |
 |
3★ Hero Choice Card | 2,000 | Gives: 1 x 3★ Frag |
 |
Advanced Recruit Coin | 0 to 200,000 |
|
 |
Intermediate Recruit Coin | 0 to 80,000 |
|
 |
Basic Recruit Coin | 0 to 20,000 |
|
 |
Timed Tavern Token | 0 to 300,000 |
|
 |
Ace Frags | 0 |
|
 |
Joy Jackpot II Box | 200,000 |
|
 |
Hero Perfect Frag | 0 |
|
Beyond simply using items, there are many other ways to either obtain frags directly, or obtain the items above.
| Method | Quest Points | Notes |
|---|---|---|
| Noah’s Tavern – Point Exchange | 0 | You can recycle unused hero frags, then trade them in Noah’s Tavern. This does NOT give you showdown quest points. |
| Hunt Zombies | 0 to 20,000 |
|
| Rally Zombie Lairs | 0 to 20,000 |
|
| Hero Survival Shop (Arena) | 2,000 to 8,000 | In Arena shop, you can purchase the following items:
|
| Commander Conquest Shop (Arena) | 8,000 to 20,000 | To get Commander Duel Medals, you must compete in Commander Duel Arena event, and be ranked.
In the Commander Conquest Shop, you can get the following items:
|
| Rare Earth Shop | 20,000 | Trade Rare Earth for McCarty frags |
| Ruins Shop | 8,000 to 20,000 |
|
| Reservoir Shop | 20,000 |
|
| Flag Capture Shop | 20,000 |
|
| Holiday Events and Shops | 20,000 to 30,000 | Many of the holiday events and shops provide 5★ and 6★ hero frags, hero choice cards, timed tavern tokens, or hero perfect frags. |
| Arena Boxes | 0 to 4,000 points | When you challenge in Arena, you get Arena boxes, which might give you 1 to 2 Flint frags. |
Additional Strategies:
- I save all of my 4★ and 5★ Hero Choice cards for Showdown week
- I save all of my Noah tokens for Showdown week. Using 9x tokens gives you 10x recruit attempts and each attempt could give you 0, 1, or 10 fragments of varying quality.
- Typically doing 9x Advanced coins 4 to 8 times (36 to 72 coins) allows me to complete 240-point quest (1,000,000 quest points).
- Noah isn’t guaranteed, so be sure to have a backup plan if all you get are speedups. For example, let’s say you run out of Advanced coins at 750k quest points. You could burn some Intermediate coins, buy some Levina frags from the Reservoir shop, or some McCarty frags from the Rare Earth shop.
- Also, even if you don’t need them, you can purchase 10 Varvara frags per day (80k quest points), and trade them later in Noah’s shop.
Quest – Craft Nanoweapons
Completion
Craft the requisite number of nanoweapons within the allotted time.
You can only accept this quest if your HQ is level 20+ and your gear factory is level 20+.
Quests
| Points | Nanoweapons | Timeframe | Notes |
|---|---|---|---|
| 240 | 20 | 4D | . |
| 176 | 10 | 1D6H | . |
| 120 | 8 | 12H | . |
| 113 | 6 | TBD | . |
| 80 | 4 | 18H | Delete quests under 100 points |
Analysis

All of the point values for this quest type are good points.
Although there is some disparity for the 120-point quest, as compared to the 113-point quest which requires 6 crafts, the 120 only requires +2 more, which is completely reasonable.
Delete the 80 point quest, which is under 100 points.
Strategy
Recap of how instacrafts work:
- To craft a nanoweapon, go to Gear Factory, Nanoweapon. Under “Craft Weapon” there are two tabs – “Normal Craft” and “Exclusive Craft”. Either tab can be used to craft nanoweapons.
- As you use instacrafts throughout the day, the number required for the next craft increases by n, up to 10. For example, crafting 5 using instas requires 1+2+3+4+5 = 15 instas.
- Everything above the 10th craft requires 10 more. For example, crafting 11 using instas requires 1+2+3+4+5+6+7+8+9+10+10 =65 instas, rather than the 66 you would expect.
- The number of instas required resets back to 1 after reset each day.
- You can use diamonds to instantly craft, but this gets expensive quickly. The cost in diamonds is equivalent to 500 diamonds per insta. For example, crafting 9 nanos using diamonds would cost 45 * 500 = 22,500 total diamonds. The 10th and successive craft speedup would cost 5,000 diamonds each.
- When you disassemble a nanoweapon, you get nano fragments that can be spent in the Nanoweapon Store. Instacrafts can be purchased for 5 fragments each.
Crafting strategy:
- When you press the “Craft” button to begin the crafting process, you get credit for completing the craft, even though the crafting process takes a while to complete.
- This means that you only need to burn instacrafts for n-1 crafts, and leave the last one baking. For example, if you have a craft 10 quest, you can craft 9 using instas, then craft the 10th one, but leave it baking.
- Similarly, if you have a nano blueprint, you can start a craft there as well, and leave it baking. For example, if you have craft 10 quest and a blueprint, you can start an exclusive craft and leave it running. This leaves 9. Instacraft 8 more, then leave the 9th running.
| Goal | Material | Diamonds* | Instas | Diamonds* | Instas (n-1) | Diamonds* | Instas (n-2) | Diamonds* |
|---|---|---|---|---|---|---|---|---|
| 20 | 2,000 | 4,000 to 12,000 | 155 | 77,500 | 145 | 72,500 | 135 | 67,500 |
| 10 | 1,000 | 2,000 to 6,000 | 55 | 27,500 | 45 | 22,500 | 36 | 18,000 |
| 8 | 800 | 1,600 to 4,800 | 36 | 18,000 | 28 | 14,000 | 21 | 10,500 |
| 6 | 600 | 1,200 to 3,600 | 21 | 10,500 | 15 | 7,500 | 10 | 5,000 |
*Diamonds = Cost in Diamonds
For larger quests (176 / craft 10 and 240 / craft 20) consider splitting them over reset.
For example, the 240-point (craft 20) quest, assuming you have a blueprint, the remaining 18 crafts requires 125 instas to craft 18. However, if you split this quest across reset, you can do 9 crafts (45 instas) before reset, then another 9 crafts after, for a total of only 90 instas.
Quest – Get Nanoweapon Material
Completion
Completion requires earning quest points by obtaining material within the allotted time:
| Points | Nanoweapon Material |
|---|---|
| 1,000 | Weapon Promoter |
| 5,000 | Weapon Promoter II |
| 100 | 1* Weapon Enhance Material |
| 500 | 2* Weapon Enhance Material |
| 2,000 | 3* Weapon Enhance Material |
| 5,000 | 4* Weapon Enhance Material |
| 20,000 | 5* Weapon Enhance Material |
| 0 | Promote Weapon, Convert for Materials |
You can accept this quest if you are HQ20+, even if your gear factory is not yet 20.
Quests
| Points | Material | Timeframe | Notes |
|---|---|---|---|
| 240 | 1,000,000 | TBD | . |
| 176 | 480,000 | 1D6H | . |
| 120 | 360,000 | 12H | Consider Deleting this quest |
| 113 | 240,000 | 1D | . |
| 80 | 120,000 | 18H | Delete quests under 100 points. |
Analysis
Consider deleting the 120-point quest. Although the points aren’t bad, it requires 50% more material as the 113-point quest for similar points.
Strategy
Use minty-blue Nanoweapon Material boxes (  ) to get points.
Each box gives a random amount of material, in the range of 6,000 up to 20,000 points, plus a chance to get an instacraft and a chance to get a “Desert Magnum” blueprint (can be used with exclusive craft).
From a practical perspective, you get about 10k to 15k per box:
| Points | Approximate Boxes | Start with |
|---|---|---|
| 1,000,000 | 100 | 80 |
| 480,000 | 48 | 40 |
| 360,000 | 36 | 30 |
| 240,000 | 24 | 20 |
Because of the random element, always make sure you have slightly more boxes than you think you will need, before you accept the quest.
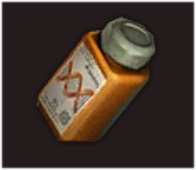
Quest – Bioenhancer
Completion
Earn quest points by obtaining Bioenhancers and shards. Earn the requisite points within the allotted time.
| Points | Bioenhancer | Color |
|---|---|---|
| 20,000 | Basic Bioenhancer | Green |
| 100,000 | Int. Bioenhancer | Blue |
| 400,000 | Adv. Bioenhancer | Purple |
| 1,000,000 | Super Bioenhancer | Yellow |
| 2,000,000 | Apex Bioenhancer | Red |
| 200 | Basic Bioenhancer Shard | Green |
| 1,000 | Int. Bioenhancer Shard | Blue |
| 4,000 | Adv. Bioenhancer Shard | Purple |
| 10,000 | Super Bioenhancer Shard | Yellow |
| 20,000 | Apex Bioenhancer Shard | Red |
| 100 | Organ Stimulant | Yellow Test Tube |
Quests
| Points | Material | Timeframe | Notes |
|---|---|---|---|
| 240 | 1,000,000 | 4D | . |
| 176 | 480,000 | 1D6H | . |
| 120 | 360,000 | 12H | Consider Deleting. |
| 113 | 240,000 | 1D | . |
Analysis
Consider deleting the 120-point quest. Compared to the 113-point quest, it requires more resources for the points given.
Strategy
All of these are fairly challenging, unless you have tons of Trial Medals (Prison Trial).
Shards are available from the Prison Shop, but unless you have beaten Prison Trial levels 6 or 7, beating the higher-point challenges will be very difficult.
For example, if you have beaten Prison Trial level 6, you can buy Advanced (purple) shards, which give you 4,000 points each. However, to beat the 1,000,000 point challenge, you need to purchase 250 shards, which costs 25,000 Trial medals total.
Just to recap, a “shard” is 1/100 of a bioenhancer. Once you have 100 frags of the same type, these can be converted in to an actual bioenhancer.
I usually delete these quests after a short time if no one has grabbed them.
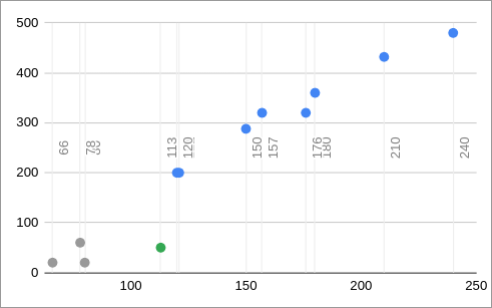
Quest – Arena Challenge
Completion
Challenge the requisite number of times in Arena, within the allotted timeframe. Win, lose, or flee doesn’t matter.
Quests
| Points | Challenges | Timeframe | Notes |
|---|---|---|---|
| 133 | 12 | 2D | Easy Points! |
| 113 | 10 | 1D12H | Easy Points! |
| 78 | 5 | 1D | . |
| 60 | 2 | 12H | . |
Analysis
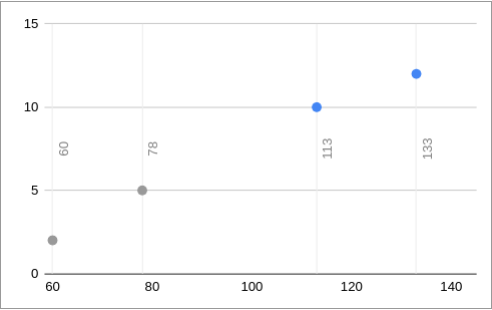
60-point and 78-point quests should be deleted as they are under 100 points, although these are good “point fillers” for Sunday.
Both the 113-point and 133-point quests are easy points!
Strategy
This is one of the easiest quests! What’s nice about Arena quest is that you don’t have to win. Actually, you don’t even have to play – you can click the “Flee” (exit) button and still get credit!
You get 3 free challenges per day, plus 10 Duel Passes. You can purchase up to 10 more Duel Passes per day at 50 diamonds each.
I usually keep about 100 Duel Passes on hand just for Showdown.
Quest – Quiz (Radio)
Completion
Take the requisite number of Radio Quizzes (answering correctly or incorrectly doesn’t matter) within the allotted time.
Quests
| Points | Quizzes | Timeframe | Notes |
|---|---|---|---|
| 167 | 25 | 4D | Consider deleting this quest. |
| 118 | 6 | 1D | Easy points! |
| 89 | 10 | 3D | Delete quests under 100 points. |
| 73 | 6 | 2D | Delete quests under 100 points. |
Analysis
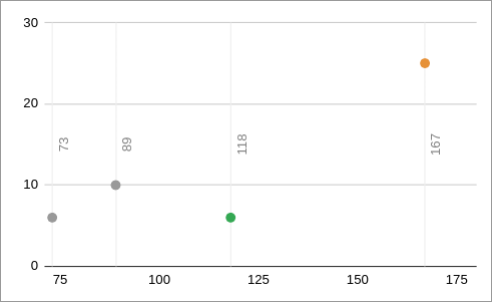
The 73 and 89-point quests should be deleted because they are under 100 points.
The 167-point quest is good points, but cooking off the cooldown for 25 quizzes make this challenge brutal. Consider deleting.
The 118-point quest is easy points, and can be completed in about 30 minutes at most.
Strategy
When you take a radio quiz, it starts a cooldown timer which must expire before the next quiz is available. Cooldown timers are somewhat random, but increase every time you take a radio quiz, starting at a few minutes, and increasing all the way up to about an hour. After reset, the radio quiz cooldown resets.
It takes about 30 minutes to complete the 118-point (x6) quest, which isn’t too bad.
It takes about 20 hours to complete the 167-point (x25) quest within one day (reset to reset)! If you split this across a reset, it takes about 12 hours total. In either case, this quest requires a tremendous investment of your time, and completing it can be brutal.
Quest – Defeat Zombie Lairs
Completion
Lead or join a rally AND defeat a zombie lair, the requisite number of times within the allotted timeframe.
At one point in time, holiday monsters didn’t count toward your lair count for the quest, but this was recently fixed (as of late 2023).
Quests
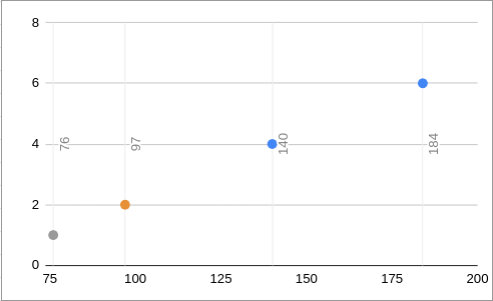
| Points | Lairs | Timeframe | Notes |
|---|---|---|---|
| 184 | 6 | 2D | . |
| 140 | 4 | 1D12H | . |
| 97 | 2 | 1D | Consider deleting this quest |
| 76 | 1 | 12H | Delete quests under 100 points |
Analysis
The 76-point (x1) quest is under 100 points and should be deleted. However, this makes a good “point filler” for Sunday, for people who need to get just a few more points before Showdown ends.
The 97-point (x2) is easy points! However, it’s just under 100 points. I tend to delete this quest in more active alliances and leave it on the board in less active ones. This is also a good point filler for Sunday.
Strategy
- Level 1 through 7 lairs take the same amount of stam. The next step up, level 8, requires 4 to 5 more stam (depending on your McCarty level).
- You can do x6 challenge with 120 stam (or less) by running all level 7 lairs.
- In more experienced alliances, when people see you set a level 7 rally, they will start some more for you.
- If not, ask your allies to set some level 7 rallies. Just remember that you have a maximum of 5 march queues. If you set 1, you can only join 4.
If you are in a less-active alliance:
- Accept lower-point quests (97 and 140)
- Wait until you know more active players will be on
- Start a longer-running rally (30 minute / 1 hour) with a note that says “lairs challenge” in alliance chat
Doomsday Expedition – Considerations
- Lairs in Doomsday start at level 30, and thus require more stam than a normal level 7. If you get the 6x Lairs quest, consider leaving doom in order to avoid needlessly burning stam, or plan to complete the quest in 2 sessions instead of 1.
- Each march in Doom requires a war hound. To use all 5 marches, you need 5 war hounds.
Alliance Strategies
As an R4 / R5, these are some things you can do to help the alliance as a whole during Showdown.
- The most important thing is to have all R4/R5 get in the habit of deleting crappy quests.
- Get rid or ?’s
- Get rid of anything less than 100 points (except maybe 97-point Lairs quest)
- Get rid of other low-yield quests (see lists above)
- Twice per day, churn the quests. This means deleting every quest on the board. Do this at pre-arranged times, so that everyone knows when to look for new quests.
- DO NOT over-churn the tasks. Nothing is more frustrating than having 15 minutes to play during a break, only to find out that all of the quests are refreshing.
- Have people send you a list of “preferred” quests so that if one pops up, it doesn’t get deleted. Make all R4/R5 aware. For example, I’ve had people who need food ask me to keep Food Gather quests, which I normally delete.
- Have pre-arranged times to do Showdown helps, lairs, and stam. If your alliance already has a Hunt Mastery event, that’s a good time to help with Showdown quests as well.
- Send out daily encouragement, and try to remind everyone to get at least 1,000 points.
- In addition to alliance total points, which unlocks new reward phases, you must have sufficient personal points to access them. 1,000 personal points is required in order to access all reward phases.
- When you see easy quests pop up, talk about it in Alliance chat, and encourage people to try them.
- Fill as many slots as possible before Showdown starts. Bring farms, bring friends, bring people off the street if you can. If you know of a less-active alliance, invite them to come visit for showdown, since this benefits everyone.
My View on Showdown Minimums
Many alliances enforce a personal quota for showdown, such as 1,000 points or 1,500 points. Whoever doesn’t meet the minimum gets kicked out, either to go to a farm alliance, or just kicked out in the cold.
I think this is a terrible idea for many reasons.
Most of all, I think people should come first, above and beyond anything we should be required to do within the game. There are ways to encourage people without threatening them.
Many people play the game for the companionship and emotional support from other alliance members, and a lot of people view their alliance as a second family. Nothing says family like “you’re family….as long as you meet your Showdown quota”.
On the one hand, I think everyone should do at least a couple of quests. There are easy ones that don’t take any time, effort, diamonds, material, nor money. For example, the Arena, Lairs, and Stam quests are super easy. On the other hand, people have RL (Real Life) stuff going on – they work long hours, have demanding jobs, have to care for loved ones, or have challenging schedules, and asking them for even MORE of their personal time isn’t fair.
I think a much better approach is to watch the bottom of the top contributors list. Look for players with 0/2, which means they attempted a quest or two, but failed. Ask them what quest they attempted, then give them pointers for next time, or help them find a quest they can more easily complete.
In general, you should have a policy for people who will be out of pocket. People travel for work, go on vacation, or might just need a sanity break. Taking a week or two away from the game is something that people should be allowed to do. As a leader, you should be sending out regular reminders to let R5 know if you plan to take time away from the game, and this includes not having to worry about a Showdown point quota.
Farms
Having a farm in the main alliance is a privilege, and therefore farms should be required to contribute during events – especially Showdown and Valliant Conquest.
I hear you shouting…BUT YOU JUST SAID, people come first!
Yes, they do. But if you have multiple accounts in the main alliance, it’s not fair to have a farm taking up a slot that could be used by an active player, or a player who is willing to contribute with their farm. You’re not kicking the player out, just their farm. Even if the farm completes just a couple of quests, that helps the alliance.
- Send out an alliance mail at the start of showdown.
- On Thursday, if you have farms that still haven’t contributed, send a warning message to the main.
- On Sunday after reset, if the farm still hasn’t contributed, give the player 24 hours to get their farm moved to the farm alliance.
The biggest challenge in the game is resource management, and having only 100 slots available in your alliance is one of the resources you have to manage. Making sure that active players sit in as many of those slots as possible benefits the alliance – your alliance will grow faster and score higher during events, including Showdown.
On the other hand, if you have free slots in the main alliance, and you can fill them with ACTIVE farms for Showdown, do it!
Player Strategies
It’s fairly trivial to get 1,000 points, and if you put in a little bit of effort, 1,500 points is not too difficult.
- Before showdown, save up EVERYTHING. Save speedups, Noah tokens, hero cards, promote / enhance boxes, minty-blue nano boxes, instacrafts, and keep producing nanoweapon material.
- Save up ruins medals and rare earth.
- Ruins medals can be traded for Chip material or Varvara frags
- Rare Earth can be traded for McCarty frags, but also for rss needed to complete Showdown quests such as Build, Tech, Train, or Mystery Shop
- If you have fewer than 5 marches, don’t accept any gathering quests
- If you have a big build or large research planned, save it for showdown and do Build, Tech, or Build/Tech/Train quests.
- If you are a smaller HQ, or you have used up your speedups / coins / boxes / etc, look for other types of quests such as Arena 133, Radio 118, Lairs 140, Lairs 184
- Mystery Shop quests are good points.
- Pull resources from the pit if needed.
- Perform resource trades before speedup trades
- Set a timer to ensure you don’t forget about making new trades and completing your quest
- For x10 and x15 quests, do the diamond trade if offered.
- If you are small, try to get to HQ20 / Gear Factory 20. Not only is this the minimum level required to attend Feast, but you can accept Nano quests, which gives you more quest options.
To really maximize your points, do as many “star” (240-point) challenges as possible, and don’t accept any quests less than 150 points.
If you get stressed out, ask R4/R5 for help. Someone will be happy to help you, because points the you earn benefit the entire alliance.
Doomsday Expedition – Considerations
As Doomsday is a new event as of this writing, questions arose about how Doomsday will affect Showdown.
- In general, most quests don’t rely on the map, nor on marches, and it is anticipated that these will behave the same whether you are in Doomsday or not. If this is NOT the case, I will post updates here.
- Get Diamonds via Packs
- Spend Diamonds
- Mystery Shop
- Help Allies
- Get Gear / Chip / Module / Cube Material
- Get Modification Material
- Build / Tech / Train Speedup
- Consume Stamina / AP
- Get Hero Frags
- Craft Nanoweapons
- Get Nanoweapon Material
- Bioenhancer
- Arena Challenge
- Radio
- Purchase Pack
- The following quests do require interaction with the map, and therefore there are considerations for Doomsday – these have been noted within the main section for each.
- Gather Resources – Resource tiles go up to L13. (Does not require a War Hound)
- Transport Resources – Each transport requires a War Hound. (Does not require a War Hound)
- Consume Stamina – War Hound Factories (towers) are like zombies on the normal map. Lairs start at level 30 and go up to 70. Each active march requires a War Hound.
- Defeat Zombie Lairs – Zombie lairs start at level 30 and go up to 70. Each active march requires a War Hound.
- It is anticipated that there will not be any Doomsday-specific quests, as only the top 5 alliances could even complete them.
- If you join an alliance after Doomsday’s qualification period, you can join the alliance, but you can’t teleport to the Doomsday map. Many players join larger alliances during showdown in order to get access to more rewards. Although this is still possible, players who joined after Doomsday started won’t be able to enter the Doomsday map, and therefore can’t join lairs inside of Doomsday, nor gather L8-13 resources.
- If you leave Doomsday, there is a 5 minute cooldown period, before you can re-enter. Plan ahead, and ensure that if you have to leave Doomsday, it’s not during an event.
- If you are participating in Doomsday and leave the alliance, you are teleported back to the normal map. Although you won’t be able to enter Doomsday while visiting another alliance, if you rejoin your original alliance, you can subsequently re-enter Doomsday.
Conclusion
If you made it this far, thank you for reading, and hopefully you found it helpful!
Comments, corrections, more showdown tips, and suggestions are welcomed!
Pingback: Welcome! | Puzzles and Survival Stuff